|
|
请使用QQ关联注册PLM之家,学习更多关于内容,更多精彩原创视频供你学习!
您需要 登录 才可以下载或查看,没有账号?注册
x
Teamcenter11.2 升级到 Teamcenter 11.4 图文教程* z) ]! Q$ }8 W7 i0 Q+ b( b
视频教程请参考plmhome.ke.qq.com
) ^! H/ A) b; K, s
6 Q1 R% T9 P. }===Clearlocks======
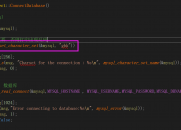
2 [6 ~) J- V( `9 R: `clearlocks -assert_all_dead -u=infodba -p=infodba -g=dba
$ n1 C0 p9 l9 o1 v p- T. lclearlocks -verbose/ H6 @' p: ~8 ^8 w+ V6 K
! @6 P. {3 m" ]+ a) Q8 u: U
; Y+ C6 k0 L" z$ A! v7 Q6 ?
11.4 的升级比较特殊,特殊的两部如下:
& d6 M0 r% R- I7 B* V: ]/ I6 ? \3 k$ _+ V" [8 L4 X
REM === Migrate trace links =====
4 L1 Y$ w$ `6 I% g$ A' G0 r, {' s
* Z9 k% h2 v) w7 g1 b6 }5 Q# P# Nreq_migrate_bomview_tracelinks -u=infodba -p=infodba -g=dba8 ~6 K8 R( s" s3 n& a0 D3 s' B
; E0 \5 o; S J) G. m: t' [- z% i0 g( Y+ M" @
====DB =======$ w3 h K0 e' j& e) s; \
=====backup====5 J0 K; f: T/ h% D; G
6 t: `. J3 S% d. Q; f6 _- Q7 u
7 f1 _. L" U8 v/ l" `5 h
REM ==Estimate tablespace requirements for update====7 j1 H4 A4 H- h
Oracle databases:/ A- F& c! {) ^" Z, `# r$ S
1. Back up existing Teamcenter data.1 [" W5 G, A, l5 z7 I' s; q, Z5 L
2. Determine the tables affected by the update to Teamcenter 11.4.
2 G. X- }$ ]7 W& ^" K1 v! va. Enter the following SQL command:$ O: C" v" l$ p2 ~4 W- Z7 R3 I6 C
* ~% N+ V+ A* k/ v; QSELECT ptname FROM PPOM_CLASS WHERE BITAND(pproperties, 8192) <> 00 T" J* E" q) t$ ^! _" s4 M% c
UNION' F o# D3 y2 o/ s! \
SELECT ptname FROM PPOM_CLASS WHERE BITAND(pproperties, 32768) <> 0;
6 p) O+ I3 e% o6 @4 G; g1 f* R0 F% s' _2 W% u# @
b. To the resulting list of tables, add the PIMANEXPORTRECORD and PPOM_STUB
0 A9 m4 K' V! s) K" D, R! j$ k8 itables, which are also affected by the update process.
' Z6 [" s9 g! @( O& \- k: h/ x8 f
! u& B% Y" b/ BDetermine the amount of space consumed by each affected table.7 u: p* _, ~; r1 m @8 L
For each table identified in step 2 (including PIMANEXPORTRECORD and PPOM_STUB),
6 ]: R) G3 { b) z
0 d# k ^$ F! Q7 yenter the following SQL command:
7 ^ u3 @5 Y/ i L. f" dWITH cte1
4 |, {8 i+ f& x( }AS (SELECT table_name
+ j8 O' e/ ~; X6 A; W- ~5 L, kFROM user_tables* F7 x- i4 r6 }) _3 t6 K- i# [1 k
WHERE table_name = 'TABLE-NAME'),) b3 D0 b3 ?: Q& M% |: }" G
cte2
4 m5 U# K0 b) y' i$ h4 G- `' T/ T1 XAS (SELECT SUM(blocks) * 8 / 1024 MB
! z( [7 `2 G6 D7 A3 u4 qFROM dba_extents,
+ }) [4 z& Q4 {+ s/ H2 J+ a9 ?cte17 L$ X3 ^# ~' k
WHERE owner = (SELECT SYS_CONTEXT('userenv', 'current_schema')$ Y' U3 x) j7 i. f& t- G. Q
FROM dual)! {& Y: c- k, }0 d9 h& ?* F" u9 H
AND segment_name = cte1.table_name)3 F5 N- v6 l* D* w* A! X
SELECT ROUND(SUM(mb), 0) || ' MB' AS ESTIMATED_SPACE
4 Y6 R" d( s2 A5 e8 C, H; p0 m1 vFROM cte2;2 ~7 \% \/ t0 {
& R4 Q5 t" Y+ O# C* s6 HReplace TABLE-NAME with the name of the given table.
% ^* C" a! n" m1 p; ^# Q$ K k
3 `$ M7 D' K5 A& m% {6 ]- F$ D' y" `- ]1 g* U: m$ l6 {1 A7 N$ l
9 o2 r4 k+ u# w3 l, _REM ==unzip install.zip ======
7 Y9 M( p$ I7 b* u$ b1 o3 ~
# Q0 z# w* {$ g, m& GTC_ROOT\install\install\unzip -o install.zip% E0 }* n. c7 g4 ~) v( m
& I7 U+ j, s+ G* A+ E0 a9 E
' }( u4 J. `4 K. s" u
3 J, b. s$ Z& ? ^# ?4 H4 sREM ===Install patches on a Teamcenter server====4 M) R4 I# L0 A( O# P" j
1 C' s9 Q' Q U
TEM--> updates manager _4 s5 I+ h( ~3 u% G" D
' z2 V3 o4 n N0 b
REM === Update kit location : product-level_number_platform.zip // Tc11.4_wntx64.zip
7 n( r: V/ J: S3 @4 l! q0 I2 K
" N# w- ] F Q: bAfter the server is successfully patched, you must manually update your TC_DATA directories.
! S. @, m$ ]( @' x. La. Create backups of your current TC_DATA directories.
! R+ ?5 K" w" c: p* ob. Expand the platform\tc\data.zip file from the temporary location you created in step 1.
) |; X" w3 g* S7 J6 qc. Copy the expanded contents of the data.zip file to your TC_DATA directories, overwriting2 f: \8 o3 E' S
existing files.
5 H# [/ f+ `( Rd. Copy the tc_profilevars.bat file from the backup to the TC_DATA directory.
" r p$ @+ _, N+ ]4 j$ ] I# J6 `3 i2 U$ y4 |: [& f- \
_6 Z/ X$ t: u, q: \9 y; U
. D2 v8 j ~9 B0 d& _' M, u7 C8 u8 D' x! L
* l. _. _2 n* b- B L8 N# S- p7 o+ ^. E( E) `* X& z! b
========Patch the rich client using TEM5 b0 N) [' e' @
========Patch the rich client using the Over-the-Web Installer$ a, ], Q; |# z* ?4 c& W+ s
0 f" I2 d6 C0 T ^8 D
' X% J* p/ N% d" Y0 U/ ea. Click Reinstall Solutions.% P# D. z# Z; y5 ]2 P
b. In the Reinstall Solution dialog box, click
& _2 V# _2 m, Z% R" l# GOK.13 T E: W5 x" u" c" A2 F
c. In the Confirm dialog box, click Yes. k. T- b6 I: ^- x1 }
d. In the Modify Required Context
( D! g. S' B: z/ }& IParameters dialog box, click OK to begin7 |( @ u" r+ y2 M9 N( W; x
patching.
) J3 Y" N# E9 a6 `2 d2 Ae. After the patch is installed, click OK to- i7 t/ T: E, ~1 s
close the Progress dialog box.3 Y3 H. v4 I/ {/ v- l
9. In the Modify Web Application dialog box, click OK.
4 A, n: K. E. p/ Z9 J3 ?10. Exit the Web Application Manager.3 k' s6 m1 g6 K! I
11. Copy the otwweb directory from your WEB_ROOT\staging-location\webapp_root directory
6 ^3 g6 c: V( Y( O0 H3 `to your web server.
. n' t# a- d5 w$ T12. Restart the distribution server., W* o' m6 K% p
( N4 o/ z8 g# c. _
, S9 ^$ k$ N! d ^" |=====Patch Lifecycle Visualization====
6 k' z/ ^( O0 B
3 i0 Y: I e) _5 K3 y" B
8 ?5 [6 M2 i. M1 i$ e, {
8 i& w/ E1 l: Y6 D) o===Patch the web tier======
9 G- g, r7 t5 n3 S* B4 M. B2 ]- L' N9 G
3 D' q* U$ _( j" p2 V/ _. f5 e: ^/ a; V7 E* @
N- a% ?6 ?. e3 Y) M: m* r$ H+ R/ A" ~4 P; K2 L( t) t" o7 x
|
|


 |小黑屋|PLM之家-专注工业软件生态建设,大模型CAD创新生态


 发表于 2018-2-12 10:17:43


