|
|
请使用QQ关联注册PLM之家,学习更多关于内容,更多精彩原创视频供你学习!
您需要 登录 才可以下载或查看,没有账号?注册
x
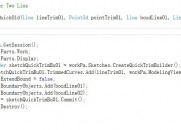
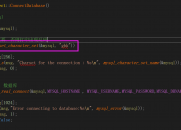
怎么才能设置线的颜色呢代码:! I( v0 C' w/ f2 b" w
1 W0 K; U* {8 K; e, W }$ O- s
* ]$ A2 e: G7 D. R0 n0 V0 [, n
Option Strict Off
: C- ?1 U" [5 m X5 Q, s6 K; gImports System8 j6 C2 O( I& @% Z7 L. {
Imports NXOpen: c! r, _. s- g% M a! l$ _
Imports NXOpen.UF2 o% o" J2 w, o6 f
Imports NXOpen.UI1 ?0 m9 }4 Z/ d
7 \9 ]" G) J! W/ n+ o
Module Module1
0 q8 h W2 F$ q f: _9 f. {8 e9 F b; i- w
Dim s As Session = Session.GetSession()
* o; z8 j: _* D8 ^" l Dim theSession As NXOpen.Session = NXOpen.Session.GetSession()
c; r9 x D; v; P. k Dim workPart As NXOpen.Part = theSession.Parts.Work
1 ]" ^: B3 E; K( ~
5 v! b0 Y* Z- i8 c, X b0 } Dim displayPart As NXOpen.Part = theSession.Parts.Display
6 G7 ?: n0 V& n/ y$ E9 s# W8 ?% g. _ ?3 ?5 |" U4 K: O# J
' Explicit Activation% B' h) r5 |6 L. Q+ o
' This entry point is used to activate the application explicitly- s2 l/ ?7 Y/ F7 G2 j/ {# @8 n
Sub Main()
3 C$ c9 B( Q2 D" h: {5 b8 Z1 X8 L
! q2 M& M$ T1 t Dim sp As New Point3d(0, 0, 0)% z5 d4 D3 m5 X! h- u( X
Dim ep As New Point3d(50, 50, 0)9 y# g; `( p$ t Y2 _
Dim nullNXOpen_Features_AssociativeArc As NXOpen.Features.AssociativeArc = Nothing
0 e7 S2 K8 Z' O2 K/ q/ A Dim theLine As Line = s.Parts.Work.Curves.CreateLine(sp, ep)
! |$ p+ M4 l) Y+ {* h Dim associativeArcBuilder1 As NXOpen.Features.AssociativeArcBuilder4 w% H% [6 P0 a# s$ u, ]
associativeArcBuilder1 = workPart.BaseFeatures.CreateAssociativeArcBuilder(nullNXOpen_Features_AssociativeArc)
( i' p+ }4 P5 E6 w8 f; p Dim point1 As NXOpen.Point
+ ]! g( F( Z f$ g point1 = workPart.Points.CreatePoint(sp)0 |" W# a! }. R- H& j. `. _' f
Dim point2 As NXOpen.Point8 s: V0 }/ Q/ e6 @
point2 = workPart.Points.CreatePoint(ep)
% q) K4 _ c& T7 z5 }9 F5 R0 f- D associativeArcBuilder1.StartPoint.Value = point1
) C& e" W- t3 p' {2 G associativeArcBuilder1.StartPointOptions = NXOpen.Features.AssociativeArcBuilder.StartOption.Point
, @, s4 O! P3 B5 H# h9 h; K! ^ associativeArcBuilder1.EndPoint.Value = point21 r T. L3 N, X6 j9 v- x V" d# I
associativeArcBuilder1.EndPointOptions = NXOpen.Features.AssociativeArcBuilder.EndOption.Point
: G' ^, e) |; u! d- h6 j Dim point3 As NXOpen.Point, e% X( J Z. T( l
point3 = workPart.Points.CreatePoint(New Point3d(0, 50, 0))+ w# _4 J; U9 {+ X5 t5 t
associativeArcBuilder1.MidPoint.Value = point3
& N4 Z3 U$ v+ x# I associativeArcBuilder1.MidPointOptions = NXOpen.Features.AssociativeArcBuilder.MidOption.Point
6 [4 G/ ~5 R0 s/ O& Z' @8 A Dim nXObject1 As NXOpen.NXObject. I* g# @/ G0 B( J
nXObject1 = associativeArcBuilder1.Commit()
& I& z! O& A0 Z8 a Dim associativeArc2 As NXOpen.Features.AssociativeArc = CType(nXObject1, NXOpen.Features.AssociativeArc)7 Q# y0 i. @; x; s8 j
associativeArc2.SetName("123")9 ^5 `# Y# R! J( M; Z/ u' B/ ~
Dim arc1 As NXOpen.Arc = CType(associativeArc2.FindObject("123"), NXOpen.Arc)% C/ H- u! ~$ ~
associativeArcBuilder1.MidPointOptions = NXOpen.Features.AssociativeArcBuilder.MidOption.Point8 u2 X/ T- D. p1 D# J7 o" N
Dim displayModification1 As NXOpen.DisplayModification8 @5 N/ u+ x; @) [
displayModification1 = s.DisplayManager.NewDisplayModification()$ M3 j$ u! c; d
displayModification1 = s.DisplayManager.NewDisplayModification() '$ t+ ?/ a& F" X2 j+ C2 o
displayModification1.NewColor = 7 '设置颜色 r u% \$ D ]( c
displayModification1.NewLayer = 10 '设置图层3 _" D) m! M% Q! I4 V
Dim objects1(0) As NXOpen.DisplayableObject
) T0 `. h! e P+ Q" _ E objects1(0) = theLine$ i: H( |7 v l6 `
Dim object2(0) As NXOpen.DisplayableObject4 x* S" Z, |5 l; Y
object2(0) = arc1
. W9 y; c- C5 M displayModification1.Apply(objects1)! A* u/ X7 T) O' a
displayModification1.Apply(object2)8 y* {' ?& {0 o( q
displayModification1.Dispose()
9 h* K! }0 J2 B! z7 w9 m# ], j S
+ Q2 T7 V# h- r+ X3 \ ' TODO: Add your application code here
. t, D3 U9 w$ e6 X. L: T4 {2 o4 V1 t9 P! f' v
End Sub- P" q: X4 v# ]* X# C
* A3 ^0 ~( H0 J- E+ e2 ?$ a$ _: R3 g F M; i. ~* b
Public Function GetUnloadOption(ByVal dummy As String) As Integer
2 D6 t: y2 z$ g5 x# M' z8 V( w( W: R+ D: o. v% Z
'Unloads the image immediately after execution within NX
3 s ]. j5 N9 D! X9 j0 | GetUnloadOption = NXOpen.Session.LibraryUnloadOption.Immediately
$ g- I- E0 ^6 i' B
) U" \7 ~. g5 o1 ] '----Other unload options-------
+ H1 `. _: L# d; C: s 'Unloads the image when the NX session terminates
' g' ~+ b! @, d0 s 'GetUnloadOption = NXOpen.Session.LibraryUnloadOption.AtTermination6 |+ n# Q/ T. p' ^
# c+ |; y+ }, e1 H
'Unloads the image explicitly, via an unload dialog; G& C+ O* P7 W" E: N
'GetUnloadOption = NXOpen.Session.LibraryUnloadOption.Explicitly4 D: K4 P& |. R+ T5 f! O
'-------------------------------
4 d' ?+ V( ?* [/ f( {4 q, @( j# c/ X, s+ v& u* R
End Function
& j L9 u9 w6 N$ ]. |( N6 \ I! k; g$ C8 [6 X$ z4 }
End Module
m. Z1 r) r# i: ]1 v- ]
- {, N, t1 B3 {% L3 a7 S7 h" b: P2 z
/ B% ^1 c* r' B. ^, Z
- T u1 N& o4 h9 k$ H0 f* W |
-
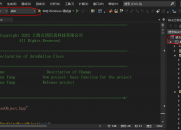
运行时报错

|


 |小黑屋|PLM之家-专注工业软件生态建设,大模型CAD创新生态
( 沪ICP备2026005248号-1 )
|小黑屋|PLM之家-专注工业软件生态建设,大模型CAD创新生态
( 沪ICP备2026005248号-1 )


 发表于 2016-7-21 21:18:53


