|
|
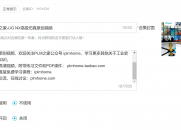
请使用QQ关联注册PLM之家,学习更多关于内容,更多精彩原创视频供你学习!
您需要 登录 才可以下载或查看,没有账号?注册
x
1. Open Microsoft Visual Studio.) h% ?1 U: K8 W( r; O/ P
2. Create a new VC++ project using the NX Open AppWizard.
: Z7 {9 u! Q; N$ U. s# U Create new project as:
, w& B# l% O/ K' k( A$ h 2.1 File->New->Project.' M7 G: P3 X! Z
2.2 Select VC++ Project using the NX Open AppWizard, DLL Library Application,) p( _+ c! W$ [7 ~6 j# c
Enter name as ExecuteCheckerAndGetResults. Click Next.# y$ a# J1 D$ ^# I
2.3 Under Application Settings, select 'An Internal application that can be
' _# @9 _" l# U activated from an NX session (DLL)'.
: n- {, l- X$ \2 L+ p S 2.4 Select C++ for What language would you like to use in the generated
' {2 J/ h" a5 N/ e5 I" ~" A2 J source files. Click Finish.
2 k# M9 N' Z" N/ K3 F; F 3. Add the ExecuteCheckerAndGetResults.cpp to the project by selecting the Project
0 z1 h4 D! f: h# S( C7 L( G+ d6 } pull down and select "Add Existing Item...". Select the file using the popup window.' f/ C1 I3 j! t2 Z G2 M! u' o* K% s
4. Right-click this project in the Solution Explorer and select Properties on the popup menu.8 x8 \) S0 L7 F8 C8 x
On the Property Pages dialog, click Configuration Manager... button to open Configuration Manager dialog.: z6 E$ u6 G( m Y1 Q5 ?$ O7 G
Select x64 for Active solution platform in the Configuration Manager when use 64 bit NX. Click Close button.: j" W, p" y0 u$ Q* q5 }. Q
2 g9 q0 `0 H9 L, j
Click Configuration Properties->C/C++->General to confirm $(UGII_BASE_DIR)\ugopen is existing in Additional
2 r+ [5 F5 W4 a0 t2 e Include Directories., X5 ]7 n: [) V2 t$ [* r; z
9 \5 j! l1 q* }1 T' H9 S8 A s) s) X Click Configuration Properties->Linker->General to confirm $(UGII_BASE_DIR)\ugopen is existing in Additional7 U# v) H3 B6 j, t2 A N, D
Library Directories.
7 r j9 S% A5 F2 ]- l0 Q6 G
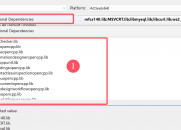
$ c4 j! f, f H, @7 M; K Click Configuration Properties->Linker->Input to confirm libnxopencpp.lib;libnxopencpp_validate.lib are; G8 g% @' r7 U
existing in Additional Dependencies.
% J" U2 l) y8 d: }5 I3 M3 i) d Click OK button to close Configuration Manager dialog.* O4 K' v1 m$ J! J; n
0 ~7 V+ s2 j6 R4 i t9 G
( E+ Y# ~# I O. K6 P, x 5. Build the internal image by going to the Build menu and selecting either "Build Solution" or "Rebuild Solution".
/ |$ Z. q3 r% o/ \8 }+ {" v9 C( B This will create an executable called ExecuteCheckerAndGetResults.dll in the Debug directory.8 C" f1 T8 Z3 F% h2 b+ `
9 S5 x3 `, M b3 ] |
|


 |小黑屋|PLM之家-专注工业软件生态建设,大模型CAD创新生态
( 沪ICP备2026005248号-1 )
|小黑屋|PLM之家-专注工业软件生态建设,大模型CAD创新生态
( 沪ICP备2026005248号-1 )


 发表于 2013-10-21 21:36:19


