|
|
请使用QQ关联注册PLM之家,学习更多关于内容,更多精彩原创视频供你学习!
您需要 登录 才可以下载或查看,没有账号?注册
x
When starting the Visual Studio to build and/or debUG NX applications, as well as when using NX utilities such as the signing tools or when running NX journals or applications, it is important that the command shell is set up correctly. This is especially important when you are working with multiple NX versions.
. c0 _, ]$ Z* J6 b; ^
2 r _0 W0 D7 N" E" Y( E
; O4 Q+ m5 y6 ` yIf you are only working with one version of NX, the easiest thing to do is:
+ `. w" W9 I; K4 c
, X8 p: L. u8 f9 P 1) Use Control Panel-> System-> Advanced system settings-> Environment 2 `: ]2 r" |8 F9 |
Variables set a user environment variable named MSVCDir to point to the VC9 E' X$ X3 @0 ]. `# B# L, o8 w
folder under the main folder of your Visual Studio install, e.g.: X: t0 ^# T* S$ y1 M
0 i) j. L+ `$ ?( J8 W' i8 d3 U% a1 R& Y+ x. T" Z. p! r+ R2 H
NX12.0:/ R, \2 V' S3 X3 o0 s+ V
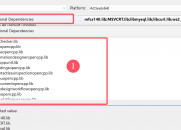
MSVCDir=C:\Program Files (x86)\Microsoft Visual Studio 14.0\VC
& u; g F8 p4 k' B/ U. T NX11.0:# C" h a) o d9 X( R" p
MSVCDir=C:\Program Files (x86)\Microsoft Visual Studio 12.0\VC2 d& {# l3 A) c l j
NX10.0:
" f5 @4 f o* L, u" U: e MSVCDir=C:\Program Files (x86)\Microsoft Visual Studio 11.0\VC7 t9 r0 E& H: w) E
NX9.0:0 O" f k6 F) O! I) f
MSVCDir=C:\Program Files (x86)\Microsoft Visual Studio 11.0\VC" `7 R) L9 j: d6 v: A! O% ?9 D, H
NX8.5:
j# F- y: g8 V) v* ?/ u MSVCDir=C:\Program Files (x86)\Microsoft Visual Studio 10.0\VC2 x; d# w! S3 J
NX7.5:
* O8 b+ }" ^4 e: W MSVCDir=C:\Program Files (x86)\Microsoft Visual Studio 9.0\VC$ y& ~3 R) h. o. s1 t
NX6.0:
& ^0 a, U2 G/ S3 ~ MSVCDir=C:\Program Files (x86)\Microsoft Visual Studio 8\VC- r7 @8 V; h" n
, g! P8 h% I$ q, n; W0 P9 |
/ U- K- R; Q: H- o NOTE: These are typical install folder paths and may not maTCh your set up!; R( I( B( q0 a/ Y6 [: c
! _6 r& ^( L$ c, A
' ^1 u5 m9 P0 p$ {* g# }
2 h) R; x' u( a% q/ p
# r% S5 q. L% i! p1 _* E) l
2) Start and NX Command Prompt window
! S7 h3 d M% _4 _( N; o1 v& Q Start-> All Programs-> NX#-> NX Tools-> Command Prompt
- o% O( l) C. b$ W8 C* J3 s6 l
! b' W6 [3 n$ O% Q; W% T. e& n3 F4 \. y$ u# D' e2 E/ k5 Q; W
The new window should show that it is setting the environment for using the
+ `1 s: W* d+ _0 N( @: w Q Microsoft Visual Studio.$ \, E9 c2 C* p" Y0 v* w' W+ K
@+ O! D% ?" R4 a
- \$ @/ `8 n9 x$ U' I4 }1 xStep 1) only needs to be done once.3 N- l/ O( k! v, w0 x- Z
" }$ [7 T+ R# C( M9 S( ^3 H H; d' \6 \- L9 d/ F
Another way to get a shell environment which is exactly the same as NX's is to start a shell from within interactive NX using a custom button added to the toolbar using these steps:
# q# \/ i5 v% V6 W - in the Toolbar <RMB>Customize
( R- q: N; w. @* h- M1 W, N - on the Commands tab of the Customize dialog select Categories -> New Item/ ^' B( p8 O7 ^9 b0 A
- from Items, drag/drop New User Command onto the toolbar
7 @6 m( n1 r5 J/ D- }6 A - on the new User Command button <RMB>Edit Action
h7 U6 q: ~7 Z - on the Button Action dialog
; I3 U, a* C4 d. O5 {2 H- h1 s2 O5 J Type -> System Commands# N `5 b0 d) i; k0 B8 @
Enter an Action or Browse( \' v; H. f7 s7 d9 ~
start "NX" cmd /k
" d# x G! u) T8 G# s7 N" Z Enter Button Message Text
7 c& d2 `. g# A/ b- Y NX Command Prompt0 i: H6 z+ Y3 H/ ~2 _
OK
1 u4 A1 t9 R) N. d, v, N# c1 k - Close (Customize)
( F8 C/ {9 T) ~+ M/ z( W! u2 F6 ^- o, D- X/ y
- x& \2 n) ~8 u! N w( A8 l: [* @
! Q" c W4 @+ R
3 i+ A, M$ j+ Q$ mIf you are working with multiple NX and their corresponding Visual Studio versions, then you might want to make a .bat file to start the NX Command Prompt for each one. The contents would look like this:
1 E% [3 w0 t& p$ o& g6 g# |) G, d$ _: H6 F( Y5 X! {
0 P; |( d' n0 r" _ set UGII_BASE_DIR=<as appropriate (see Help-> Log File)>/ c- l" K' K, {' G
set MSVCDir=<as appropriate (see above)>
& d/ Q; B u" L% g: | call "%UGII_BASE_DIR%\UGII\ugiicmd.bat" "%UGII_BASE_DIR%" AUTO) H. l) Z1 v i% g. f
for /F "usebackq delims==" %%i in (`env_print -n`) do set n=%%i
: l; z+ o! l' Z3 n' I/ t for /F "usebackq delims=," %%i in (`env_print -m`) do set m=%%i
2 J u: J7 D0 k5 \ if "%m%"=="" ( title %n% Command Prompt ) else ( title %m% Command Prompt )
( e7 }& g- C8 j- Y" n7 S cmd8 b" }$ @' \ r+ ]4 W: A
' ~+ a$ C9 k9 M# [5 R/ o) q& R1 S
" V7 s' h/ ]& [- |7 p4 nThe 3 lines starting for/for/if put the NX version in the title bar of the command window. They can be omitted./ {4 f- J' h; R \ I, C
6 R% y* q) U- e/ E2 g- \+ R' Z) r% r3 B7 x3 Q( e1 V, b
Put the .bat file or a shortcut to it on your desktop. <Double-click> to run it.
5 ~3 |# E# z- D3 s# t) a3 o9 i% g: F; _ R5 P
$ C& L' N% W0 h3 Q+ [( C- o) M
Once the shell is set up correctly, you should be able to start NX from the Command Prompt window using the command "ugii".
8 P; j) i6 k1 S) k R. _) E/ a# |/ h2 h' A0 d. g
+ Z/ Y V4 ~4 x/ I+ ]5 j! q) S" aTo start the Visual Studio to build or debug NXOpen applications, enter the command "devenv".9 y# e* h5 `+ `! k+ _1 L5 m
; @, I% h0 m1 z: `; A+ B+ O5 q! ]4 d5 t0 ~+ k+ L: ^5 @, p, \3 V
To run a journal in batch (background) mode:4 O) P% L+ D# M& Y
run_journal <path to journal> -args <any journal args here> a4 u7 y2 |$ K, i
& w( Y' o9 |; A3 j% p
. Y* [: _; t, L2 n |
|


 |小黑屋|PLM之家-专注工业软件生态建设,大模型CAD创新生态


 发表于 2018-6-5 16:10:49


